![owl-Logo-1.png]](https://help.lendingwise.com/hs-fs/hubfs/owl-Logo-1.png?width=43&height=46&name=owl-Logo-1.png)
Automation rules (Settings > Automation > Rules) run actions for you when something changes on a loan file. This article covers how actions and rules fit together, every trigger and what to use it for, scheduled actions, and step-by-step examples.
How automation works
- Actions are what happens: tasks, emails or webhooks. Build them first in Settings > Automation > Actions. How to build each one: Automation actions: tasks, emails and webhooks.
- Rules are when it happens: a trigger, such as a status change. Attach your actions to a rule.
When a rule fires it can change the file status, create a task, send an email, send a webhook or assign back office users. Rules can't generate documents or build reports.
Triggers and what to use them for
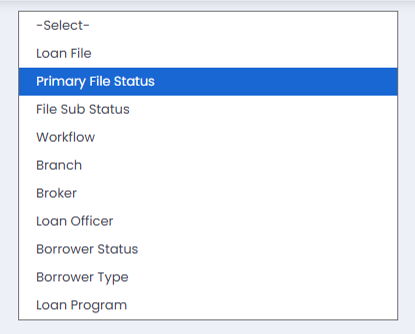
Rules can be triggered by: Loan File (Create, Update), Primary File Status, File Sub Status, Workflow, Loan Program, Branch, Broker, Loan Officer, Borrower Status, Borrower Type, Document Status, Initial Scope of Work, Draw Request and Revision.
Primary File Status
- Borrower updates: tell borrowers when their file moves, for example into "Underwriting".
- Team tasks: give someone a task to prepare documents when the status becomes "Closing".
File Sub Status
- Document requests: request an appraisal when the sub-status is "Awaiting Appraisal".
- Team alerts: tell the processing team when the sub-status is "Incomplete Application".
- Escalation: alert a manager if a file stays "Pending Review" for 3 days (use For [N] Day(s) on the condition).
Workflow
- Task creation: create tasks to verify borrower information when "Due Diligence" is ticked.
- Step emails: send wire instructions when the "Funding" step is completed.
Branch
- Tell branch members when loans are assigned to their branch.
Broker
- New application alerts: tell loan officers when a broker submits an application.
- Broker relationships: send brokers updates on their pipeline.
Loan Officer
Fires based on the loan officer assigned to the file.
- Lead routing: assign applications based on each loan officer's expertise.
- Reminders: send loan officers pipeline updates or milestone reminders for their files.
Borrower Status (set on the borrower profile)
Fires when the borrower profile's status changes. Each status can run its own actions:
- Approved: send approval letters and next steps.
- Pending Approval: flag the file for underwriting review; ask the borrower for missing information.
- Denied: explain the reasons and any alternatives.
- Credit Line Exceeded: tell the borrower about the limit; offer other amounts or programs.
- Proceed With Caution: alert management to the risk; assign extra checks.
Borrower Type
- Individual: ask for personal financials such as income statements; send personalized emails.
- Entity: request corporate documents; create a task to verify the entity's legal and credit standing.
- Trust: request trust agreements; route to a trust lending specialist.
- Retirement Entity: run compliance checks for IRS rules; send real estate investing resources.
Loan Program
- Program requirements: notify a specialist for programs like "Fix & Flip".
- Marketing: send content about a specific program.
Example: email the borrower when a Quick App comes in (status trigger)
1. Create the email (action)
- Go to Settings > Automation > Actions, open the E-mails tab and click Create Notifications. For example, a "Thank You" email for borrowers who complete a Quick App.
- Choose Instant (sent right away) or Schedule (sent later). For a welcome email, choose Instant.
- Set the sender to the branch. The branch is always on the file, so the email goes out even if, say, no loan officer is assigned yet.
- Send it to the borrower and write the subject and body, using merge tags such as the borrower's name. You can start from an E-mail Wizard template, and attach auto-generated documents if you need to.
2. Create the rule
- Go to Settings > Automation > Rules and click Create Rule. Pick the File Type / Module first (for example Commercial/Residential Real Estate); the rest of the form only shows after that.
- Name the rule and decide whether it should repeat.
- Under Rule triggered when, choose Primary File Status and pick the status new Quick App files get, for example "Lead". That status is set per form on the branch's Web Form Integration tab (gear > Default file status), so check it there.
- Click Done and attach your email as an instant action. Check that it shows as attached ("(Enabled)").
Example: send the Full App link when a workflow step is ticked
A workflow works like a checklist on the loan file. Ticking a step records progress and can also trigger automations.
- Go to Settings > Automation > Actions and click Create Notifications, or start from an email template. For this example, use the "Link to full app- Borrower" template.
- Set the sender to the branch and the recipient to the borrower, then save.
- Create a rule: pick the File Type / Module first (for example Commercial/Residential Real Estate), name it so it's clear it's a workflow rule, and turn on Allow rule to repeat if needed.
- Under Rule triggered when, choose Workflow and pick the step, for example "Send Link to Full App". The list shows the steps from all your workflows together, so pick the right one.
- Attach the email and save.
- Test it: open a loan file and, in the menu on the left under WORK, click Workflow, then tick the step. Ticking a step marks it Pending; you can change its status (Pending, Completed, Not applicable, Needs Legal Review, Needs Manager Review) from the step's notes button.
Example: order an appraisal from a workflow step
Say you want to email the appraisal rep on the file when you tick a workflow step called "Order Appraisal".
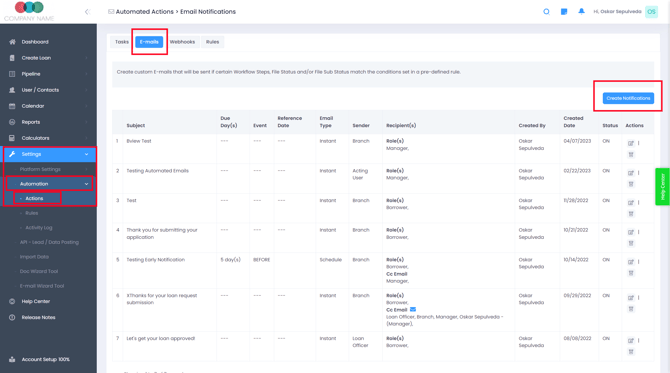
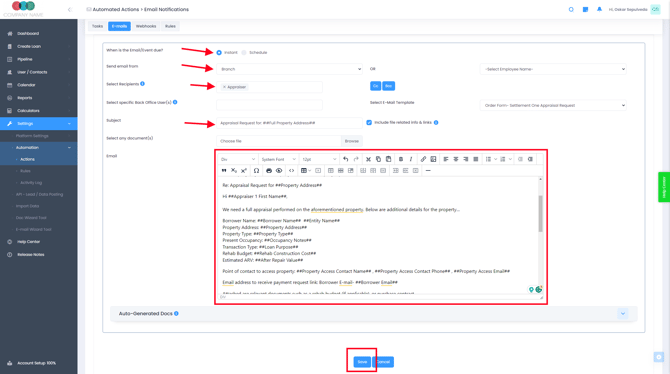
- Create the action: go to Settings > Automation > Actions, open the E-mails tab and click Create Notifications. Set the recipient, the sender, the subject and the body. Add loan, borrower or property details with merge tags. Click Save.
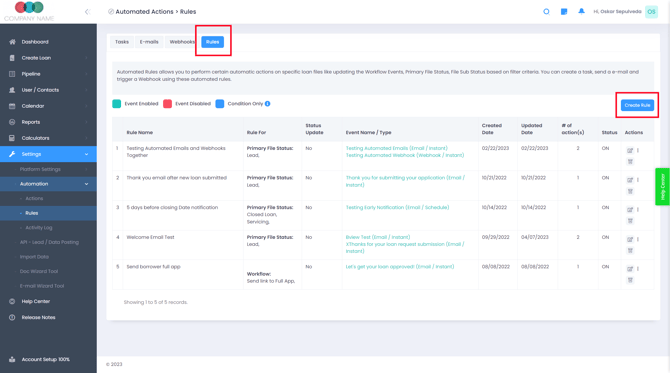
- Create the rule: open the Rules tab and click Create Rule. Pick the file type/module, and give it a clear name such as "Request Appraisal Email". Under Rule triggered when, choose Workflow, then pick "Order Appraisal" in the field to the right. Click Done.
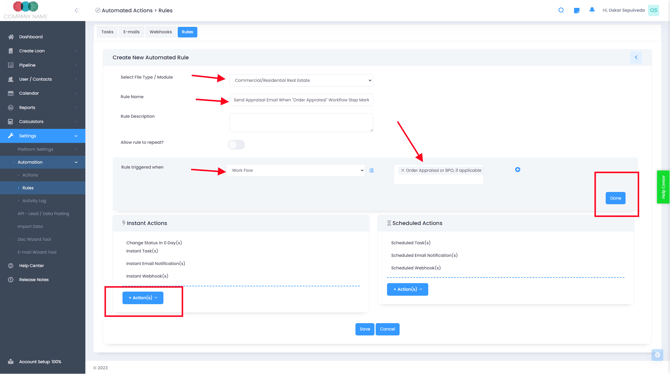
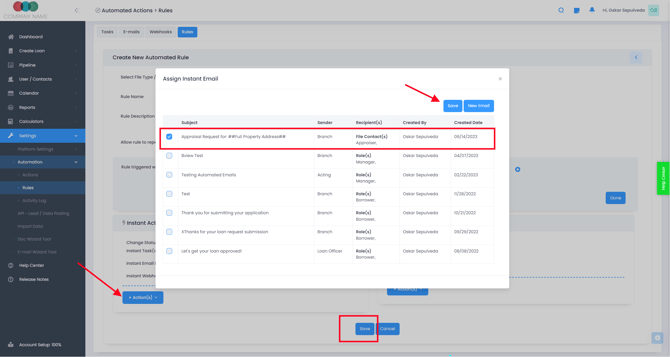
- Attach the action: the Instant and Scheduled actions show at the bottom. Under the instant actions, choose Email Notification. In the "Assign Instant Email" window, tick the "Appraisal Request" email and click Save. Then click the final Save to save the rule. You should see a green message saying "Automated Rule Added Successfully".
Leave "Allow rule to repeat?" off if the action should only run once per file. In Settings > Platform Settings > Workflow, a step used by rules shows an orange "N automations" badge; deleting that step stops those rules from working.
Scheduled actions
Tasks, emails and webhooks can be scheduled instead of sent right away. The Schedule options for each action are explained in Automation actions: tasks, emails and webhooks.
- In Settings > Automation > Actions, create the task, email or webhook and choose Schedule. Then set the number of Day(s), After, Before or On, and a reference date (for example File Created Date, Target Closing Date, Maturity Date or Funding Date).
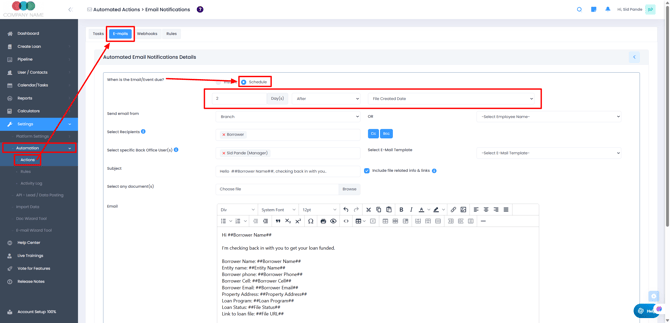
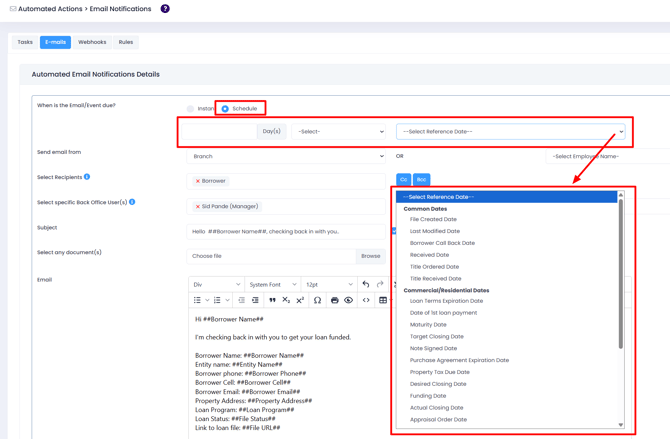
- Create the rule, then click the blue Action(s) button under Scheduled Actions to attach the item from step 1.
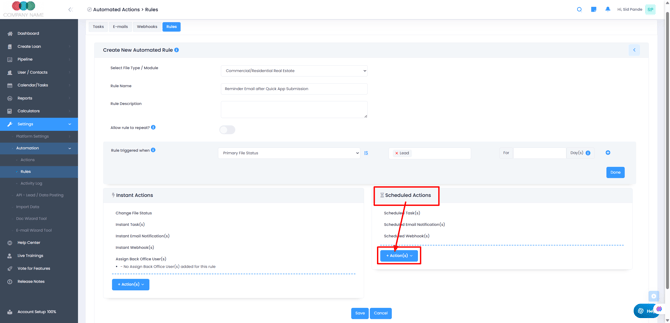
Scheduled actions run on a day, not at a set time of day. A task's Due Date and Reminder Date count from the day the task is created. Only Task, Email Notification and Webhook can be scheduled; Change Status and Assign Back Office User(s) are instant only.
In the Rules list, a blue Condition Only color means the scheduled actions will still run even if you change the rule's conditions.
Good to know
- The automations pop-up appears only when a rule matches the change you save. Clicking CANCEL in it still saves the status change but skips every automation.
- Status changes made with Mass Update run matching rules with no pop-up at all.
- With "Allow rule to repeat?" off, a rule runs once per file. Later matches show as Failed in the Activity Log, which is normal.
Need help with automation? Email helpdesk@lendingwise.com.