---
title: "Form Fields: show, hide and require fields by app and program"
description: You can customize the form fields to fill out on your Quick and Full App.
---
[Skip to content](https://help.lendingwise.com/knowledge/customize-quick-app-full-app-form-fields#main-content)
English
Show submenu for translations
[Submit Ticket](https://help.lendingwise.com/knowledge/kb-tickets/new?hsLang=en) [Customer portal](https://help.lendingwise.com/tickets-view?hsLang=en)
![owl-Logo-1.png\]](https://help.lendingwise.com/hs-fs/hubfs/owl-Logo-1.png?width=43&height=46&name=owl-Logo-1.png)
- [New Releases](https://lendingwise.releasenotes.io/)
- [System Status](https://lendingwise.statuspage.io/)
Open main navigation
Close main navigation
- [New Releases](https://lendingwise.releasenotes.io/)
- [System Status](https://lendingwise.statuspage.io/)
- English
Show submenu for translations
- [Submit Ticket](https://help.lendingwise.com/knowledge/kb-tickets/new)
- [Customer portal](https://help.lendingwise.com/tickets-view)
- Go to lendingwise.com
Go to lendingwise.com
Hello. How can we help you?
- There are no suggestions because the search field is empty.
1. [LendingWise - Help Center](https://help.lendingwise.com/knowledge?hsLang=en)
2. [Setting Up The Platform](https://help.lendingwise.com/knowledge/setting-up-the-platform?hsLang=en)
3. [Creating Your Loan Programs](https://help.lendingwise.com/knowledge/setting-up-the-platform?hsLang=en#creating-your-loan-programs)
# Form Fields: show, hide and require fields by app and program
## You can customize the form fields to fill out on your Quick and Full App.
Form Fields lets you turn fields on and off, make them mandatory, and rename them on the Quick App, the Full App and certain tabs of the loan file.
Any user who can log in (back office, branch, broker, loan officer or borrower) can create loan files with the Quick App and Full App. Loan files can also come in through the [Quick App](https://www.theloanpost.com/HMLOWebForm.php?bRc=58bff47b4f93639a&fOpt=8e614f58c0d670e4&op=aa4465703ef4b17e) or [Full App](https://www.theloanpost.com/HMLOWebForm.php?bRc=58bff47b4f93639a&fOpt=8e614f58c0d670e4&op=69ae9aa7bfc04392) webform, which you can share as a link or put on any website (Web Form Integration tab \> Add to website). Every branch and loan officer/broker has their own webforms, on the Web Form Integration tab of the [branch](https://www.theloanpost.com/backoffice/branchList.php) or [loan officer](https://www.theloanpost.com/backoffice/agentList.php) profile.
- **Quick App:** takes in the minimum information about a scenario to judge eligibility.
- **Full App:** takes in everything needed to close the loan, underwrite the borrower and evaluate the property. When you send the borrower or broker a Full App link, it fills in everything already on the file.
Our recommendation: keep the Quick App short, just enough to see if a deal fits, and save the rest of the details for the Full App.
Watch how to show, hide and require fields on your Quick App, Full App and loan file tabs, in about 4 minutes:
### Change a field
1. Go to **Settings \> Platform Settings \> Form Fields**.
2. Use the filter bar (File Type, Section, Field Name, File Tab) to jump to a section or a single field, then click **Filter**. Click the arrow beside the section's name to open it. Each section says which file tabs it's part of.
3. Tick the **DISPLAY** boxes for the places the field should show, and the **MANDATORY** boxes for the places it's required. Each column controls one place:
- **FULL APP:** your Full App web form, and the Full App tab on each loan file.
- **QUICK APP:** your Quick App web form, and the Quick App tab on each loan file.
- **OTHER TABS / BACK OFFICE:** the rest of the loan file, like the Loan Info and Property Info tabs.
4. Click that section's **Save**. Each section saves on its own, and leaving the page drops unsaved changes.
5. Check the result on your web form. To open it, go to **CRM \> Branch \> Branch List**, open your branch, and on the **Web Form Integration** tab click **Preview** on the Quick App or Full App card. Questions only show once a loan program is picked. After each change, refresh the preview and pick the program again.
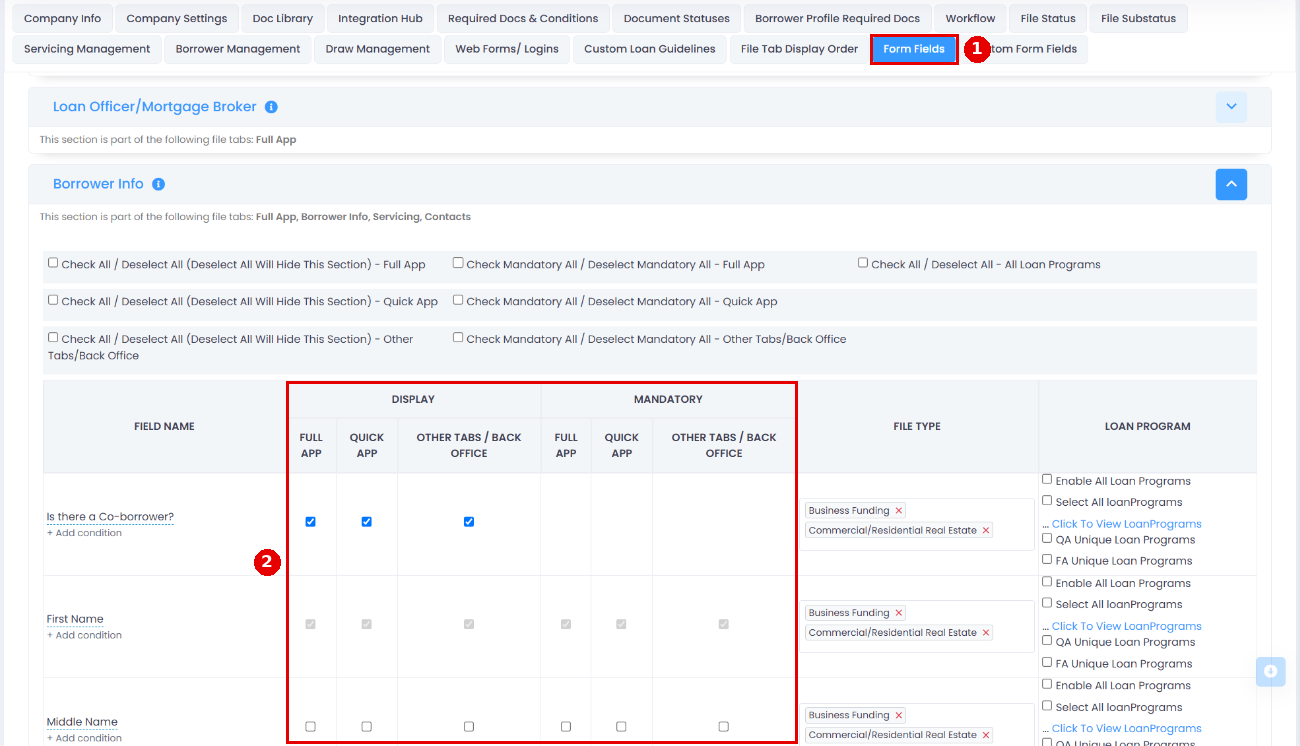 
When every field in a section is off, the whole section disappears from the Quick App and Full App.
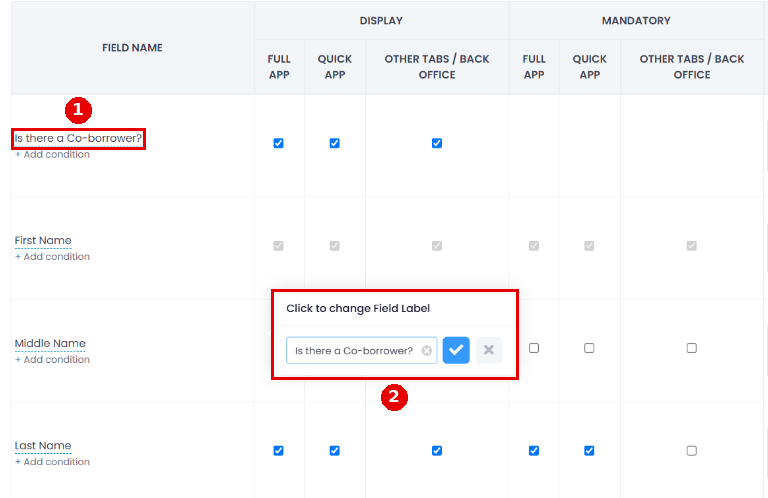
To change the wording people see, click a field's name, type the new label, and click the blue check. Inside a section, some fields sit in smaller groups, like Personal Info. Click the arrow beside a group's name to open it.
**Good to know:**
- On your web forms, people have to fill in required (peach) fields before they submit. In the back office, MANDATORY only turns a field peach as a reminder, so your team can still save a file with it empty.
- Indented fields belong to the question above them, and only show once it's answered. If you turn off a question, check the fields under it.
- Some fields belong to a parent field. Turning off the parent also turns off its children, and turning the parent back on doesn't bring them back, so recheck them.
- Some fields only appear based on another field's value (for example Annual Taxes or Total Loan Amount). Keep that in mind when turning fields on or off.
### Loan Terms: choose which rows show
The **Loan Terms** section is split into groups: Calculation Parameters, Total Loan Amount, Initial Funded Balance, Project Cost, Cash-Out Refinance and Key Ratios. Click the arrow next to a group's name to open it. (Clicking the name itself opens a box to rename the group.) Each row in these groups has its own DISPLAY and MANDATORY boxes, like any other field.
**Check this if you set up your account before October 20, 2026.** That release gave every row in Initial Funded Balance and Project Cost its own boxes, plus a row for "Calculate Total Loan Amount as". On existing accounts they start on for OTHER TABS / BACK OFFICE and off for QUICK APP and FULL APP. So until you tick them, the Quick App and Full App may show only Base Loan Amount under Initial Funded Balance, and no Project Cost rows.
If borrowers, brokers or your team should see these rows on the Quick App or Full App, tick **QUICK APP** or **FULL APP** on each row and click the section's **Save**. Our recommendation for a Fix and Flip Quick App: turn on Calculate Total Loan Amount as, Any Financed Reserves / Fees / Costs, and the Project Cost rows Purchase Price, Rehab/Construction Cost and Total Fees & Costs. Then open a test Quick App for that program to check the result.
### Rename section headers
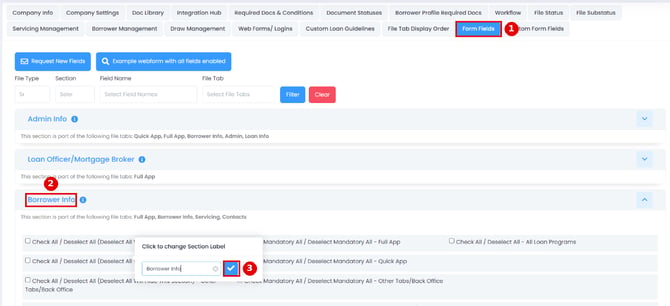
Managers (admin rights), or users with "Enable Manager Permissions?" on, can rename section headers on the Quick App and Full App. In Settings \> Platform Settings \> Form Fields, click the section label, edit the text, then click the blue checkmark to save.
### Different fields for different loan programs
Different loan programs often need different information. Setting fields per program lets you collect only what each program needs, keep the borrower's experience simple and meet investor or regulatory requirements.
**Watch:** Fields by Loan Program (2:32).
1. In Form Fields, open the field's section and look at the **LOAN PROGRAM** column on the right.
2. Click **Click To View LoanPrograms** to see the programs the field shows on.
3. To take a program off, click the red x beside it. To add one, click in the box, then pick it from the list or type to search.
4. If the field has follow-up questions indented under it, give them the same programs so they match.
5. To ask a field on the Quick App and Full App for different loan programs, see **Different programs on the Quick App and Full App** below.
6. Click that section's Save, then check the result on your web form preview or a test file with that program. Also test that the right required documents and tasks come up.
**Good to know:**
- If a field's loan program list is empty, the field shows on every loan program, including programs you add later.
- A field set to an internal loan program only shows on files where that internal program is picked.
**Careful:**
- Limiting a field to certain programs hides it everywhere (Quick App, Full App and back office) on files with other programs, with no hint on the file.
- **Enable All Loan Programs** clears the field's program list, so it shows on every program. Unticking it doesn't bring the old list back. If you click it by mistake, leave the page without saving.
- **Select All loanPrograms** adds every program you have today, including internal programs. A loan program you add later isn't added to that list automatically. For a field that belongs on every loan program, current and future, use **Enable All Loan Programs** instead.
- The **Check All / Deselect All - All Loan Programs** box at the top of a section clears the program list on every field in that section.
You can go further per program: create your own loan programs, set up workflows and automated tasks or emails by loan program, transaction type, property type and more, and set required documents for each program so borrowers only upload what's needed. Review your forms regularly, use clear labels and help text, and test each version before it goes live. See also [Loan programs](https://help.lendingwise.com/knowledge/setup-your-loan-programs/services?hsLang=en).
#### Different programs on the Quick App and Full App (advanced)
Most companies only need the one LOAN PROGRAM list above. Use this when a field should be asked on the Quick App for some loan programs and on the Full App for others. For example, you need the credit score up front to price a rental loan, but a fix and flip can give it on the Full App.
**Watch:** Different Fields on the Quick App and Full App (2:12).
1. Under DISPLAY, tick every place the field should show: **FULL APP**, **QUICK APP** and **OTHER TABS / BACK OFFICE**. A program list only picks programs. Without the DISPLAY box, the field never shows in that place.
2. Tick **QA Unique Loan Programs**. A new box opens under it. Add the loan programs that should see the field on the Quick App.
3. Tick **FA Unique Loan Programs** and add the loan programs for the Full App.
4. Click that section's Save, then check your Quick App preview and a test file.
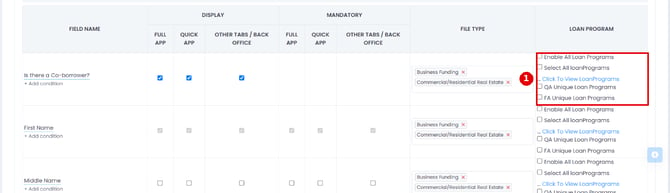
**How the lists work together:** the main LOAN PROGRAM list is the default list. Any place without its own list uses it. With both unique boxes on, the main list only controls the other back office tabs, the QA list controls the Quick App (the web form and the file's Quick App tab) and the FA list controls the Full App (the web form and the file's Full App tab). The unique lists don't have to match the main list.
**Good to know:**
- A unique box needs at least one loan program. If you save it empty, it turns itself off and the default list takes over.
- Turning a unique box off clears its list straight away, and that place goes back to the default list.
- The unique boxes don't have Enable All or Select All. You pick each program.
### Finding the right field
LendingWise has over 2,000 form fields you can turn on or off, rename or repurpose.
- [**Excel view of all fields**](https://docs.google.com/spreadsheets/d/1YPEHXw20FgcHa-_rbnGcJInv3hhe6AbD/edit?usp=sharing&ouid=106613876634004762551&rtpof=true&sd=true): every section and field available for the Quick App and Full App. Make a copy and tick the boxes so our onboarding team can set the fields up for you. This is optional: you can also work from your own sample applications or set fields directly in Form Fields.
- [**Webform with all fields enabled**](https://app.lendingwise.com/HMLOWebForm.php?bRc=e4e75f047173cd24&fOpt=8e614f58c0d670e4&lid=03155f04e9d3daeb&opt=e637bd2de4735343&ft=HMLO&op=69ae9aa7bfc04392&UType=00eedfe87c52b964): see every section, field and format to help plan your Quick App and Full App. The Form Fields page also has an "Example webform with all fields enabled" button.
To add your own fields, go to Settings \> Platform Settings \> Custom Form Fields (page heading Custom Fields). Custom Fields are included on the Elite and Enterprise plans and available as an add-on on Starter and Pro.
### More tools on the Form Fields page
- **Request New Fields** (top of the page) lets you ask for a field that doesn't exist yet. Check first that the field isn't just turned off.
- **Turn a whole section on or off:** each open section has checkboxes at the top. "Check All / Deselect All" and "Check Mandatory All / Deselect Mandatory All" work for the Full App, Quick App and Other Tabs/Back Office separately, and "Check All / Deselect All - All Loan Programs" sets every program at once. Deselect All hides the whole section on that form.
- **File Type:** each field lists the file types it applies to (Business Funding, Commercial/Residential Real Estate). If a field is on but doesn't show, check its file types and its QA / FA Unique Loan Programs.
- **AI AGENT** (only on accounts with AI agents turned on): tick it on a field to make that field available to the AI document agent. When the agent is turned on for a required doc (Required Docs & Conditions, edit the doc, **AI Settings** tab), it can compare values it reads from an uploaded document with the ticked loan fields. This column doesn't show or hide anything on the loan form.
- **Reset to Default** resets one section. The red **Fully Reset All Fields to Default Settings** button under the sections resets every field on the page, so only use it if you want to start over.
### Show a field only when conditions are met
Every field in Form Fields has a **+ Add condition** link under its name. Conditions decide when the field shows on a loan. With no conditions, the field appears on every loan in its file types and loan programs.
1. In Settings \> Platform Settings \> Form Fields, open the section and click **+ Add condition** under the field.
2. In the Conditions window, click **Add Condition**. Each row reads WHEN, then a detail of the loan, a rule and the values.
3. Pick the detail: Transaction Type, Property Type, Borrower Type, Primary File Status, Sub Status, File Tracker, Branch, Borrower Occupancy, Property State, Borrower State, Entity Type, Entity State or Credit Score Range.
4. Pick the rule: **is any of**, **is none of**, **is empty** or **is not empty**. For the first two, click **+ Add** and choose one or more values.
5. To add another row, click Add Condition again. Rows join with AND; click AND to switch it to OR. With two or more rows, the Match ALL / ANY switch sets every row at once. The line at the bottom of the window spells out the result, for example "Appears when transaction type is any of Commercial Purchase."
6. Click **Apply**, then click the section's **Save**. Apply only stages the change; nothing is saved until you click Save. The link under the field then shows how many conditions it has, for example "1 condition".
To remove conditions, open the window again and click **Remove all conditions** (or the trash icon on a row), then Apply and Save.
Our recommendation: after adding a condition, open a test loan file and check that the field shows and hides the way you expect before you rely on it.
For help, contact [helpdesk@lendingwise.com](mailto:helpdesk@lendingwise.com) or [submit a helpdesk ticket](https://help.lendingwise.com/knowledge/kb-tickets/new?hsLang=en).
- [Overview of LendingWise Platform](https://help.lendingwise.com/knowledge/overview-of-lendingwise-platform?hsLang=en#main-content)
- [Training & Support](https://help.lendingwise.com/knowledge/overview-of-lendingwise-platform?hsLang=en#training-support)
- [Privacy](https://help.lendingwise.com/knowledge/overview-of-lendingwise-platform?hsLang=en#privacy)
- [CRM](https://help.lendingwise.com/knowledge/overview-of-lendingwise-platform?hsLang=en#crm)
- [Website](https://help.lendingwise.com/knowledge/overview-of-lendingwise-platform?hsLang=en#website)
- [Setting Up The Platform](https://help.lendingwise.com/knowledge/setting-up-the-platform?hsLang=en#main-content)
- [Setting up Users and Permissions](https://help.lendingwise.com/knowledge/setting-up-the-platform?hsLang=en#setting-up-users-and-permissions)
- [Main Platform Settings](https://help.lendingwise.com/knowledge/setting-up-the-platform?hsLang=en#main-platform-settings)
- [Creating Your Loan Programs](https://help.lendingwise.com/knowledge/setting-up-the-platform?hsLang=en#creating-your-loan-programs)
- [Setting Up a Webform](https://help.lendingwise.com/knowledge/setting-up-the-platform?hsLang=en#setting-up-a-webform)
- [White Label Setup](https://help.lendingwise.com/knowledge/setting-up-the-platform?hsLang=en#white-label-setup)
- [Website Template Setup](https://help.lendingwise.com/knowledge/setting-up-the-platform?hsLang=en#website-template-setup)
- [Auto-Generate Docs](https://help.lendingwise.com/knowledge/setting-up-the-platform?hsLang=en#auto-generate-docs)
- [Miscellaneous Setup Items](https://help.lendingwise.com/knowledge/setting-up-the-platform?hsLang=en#miscellaneous-setup-items)
- [Setting up Users](https://help.lendingwise.com/knowledge/setting-up-the-platform?hsLang=en#setting-up-users)
- [Email Templates](https://help.lendingwise.com/knowledge/setting-up-the-platform?hsLang=en#email-templates)
- [Automations](https://help.lendingwise.com/knowledge/setting-up-the-platform?hsLang=en#automations)
- [Importing Data](https://help.lendingwise.com/knowledge/setting-up-the-platform?hsLang=en#importing-data)
- [Required Docs & Conditions](https://help.lendingwise.com/knowledge/setting-up-the-platform?hsLang=en#required-docs-conditions)
- [Using The Platform](https://help.lendingwise.com/knowledge/using-the-platform?hsLang=en#main-content)
- [Using the dashboard](https://help.lendingwise.com/knowledge/using-the-platform?hsLang=en#using-the-dashboard)
- [Communications and Email](https://help.lendingwise.com/knowledge/using-the-platform?hsLang=en#communications-and-email)
- [Loan Origination](https://help.lendingwise.com/knowledge/using-the-platform?hsLang=en#loan-origination)
- [Inside a loan file](https://help.lendingwise.com/knowledge/using-the-platform?hsLang=en#inside-a-loan-file)
- [Running Reports & Exporting Data](https://help.lendingwise.com/knowledge/using-the-platform?hsLang=en#running-reports-exporting-data)
- [Loan Servicing](https://help.lendingwise.com/knowledge/using-the-platform?hsLang=en#loan-servicing)
- [Lender/Investor Marketplace](https://help.lendingwise.com/knowledge/using-the-platform?hsLang=en#lender-investor-marketplace)
- [CRM](https://help.lendingwise.com/knowledge/using-the-platform?hsLang=en#crm)
- [Integrations](https://help.lendingwise.com/knowledge/using-the-platform?hsLang=en#integrations)
- [Frequently Asked Questions](https://help.lendingwise.com/knowledge/frequently-asked-questions?hsLang=en#main-content)
- [CRM](https://help.lendingwise.com/knowledge/frequently-asked-questions?hsLang=en#crm)
- [LOS](https://help.lendingwise.com/knowledge/frequently-asked-questions?hsLang=en#los)
- [Pricing Engine](https://help.lendingwise.com/knowledge/frequently-asked-questions?hsLang=en#pricing-engine)
- [Website Template](https://help.lendingwise.com/knowledge/frequently-asked-questions?hsLang=en#website-template)
- [Integrations](https://help.lendingwise.com/knowledge/frequently-asked-questions?hsLang=en#integrations)
- [Marketing](https://help.lendingwise.com/knowledge/frequently-asked-questions?hsLang=en#marketing)
- [Automations Emails and Communication](https://help.lendingwise.com/knowledge/frequently-asked-questions?hsLang=en#automations-emails-and-communication)
- [Service and Support](https://help.lendingwise.com/knowledge/service-and-support?hsLang=en#main-content)
- [Help Desk](https://help.lendingwise.com/knowledge/service-and-support?hsLang=en#help-desk)
- [Managing your Subscription and Billing](https://help.lendingwise.com/knowledge/service-and-support?hsLang=en#managing-your-subscription-and-billing)
- [Submit Ticket](https://help.lendingwise.com/knowledge/kb-tickets/new)
- [Customer Portal](https://help.lendingwise.com/tickets-view)
- [New Releases](https://lendingwise.releasenotes.io/)
- [System Status](https://lendingwise.statuspage.io/)
[](https://lendingwise.com)
Copyright © 2025, LendingWise