![owl-Logo-1.png]](https://help.lendingwise.com/hs-fs/hubfs/owl-Logo-1.png?width=43&height=46&name=owl-Logo-1.png)
Document statuses in LendingWise let you manage the labels shown in the required documents list on a loan file. With document statuses, you can: rename existing statuses, create new ones, set visibility (active or inactive), assign a unique color to each status, and control their sort order in the dropdown and Docs tab.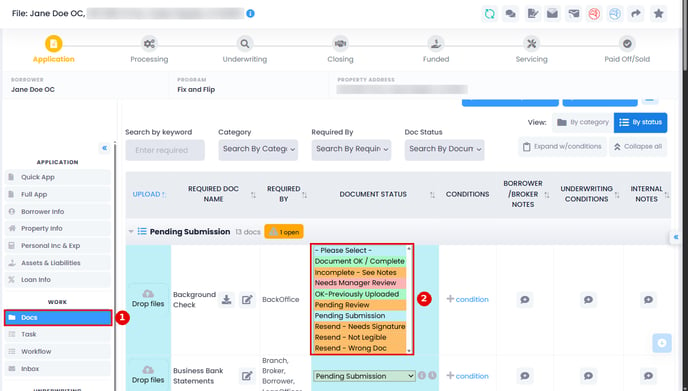
See how your team uses these statuses on a loan file in the video Request and review documents (from 1:41).
Step-by-Step Guide to Customizing The Document Statuses: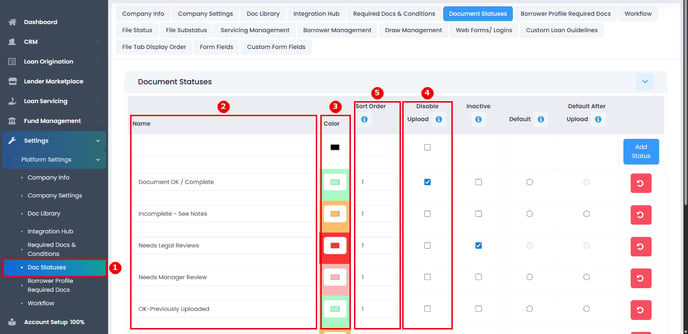
1. Accessing Document Statuses:
Sign in as a back-office manager and navigate to 'Settings' > 'Platform Settings' > 'Doc Statuses' from the dashboard.
2. Adjusting Document Statuses:
You can create new document statuses or rename existing ones. To hide a status you no longer use without deleting it, set its visibility to Inactive. Note: files that already use an inactive status will retain it — it is simply hidden from the selection list for new assignments.
3. Assigning Colors to Statuses:
You can assign a unique color to each status. Colors appear as a visual indicator next to the status name in the required documents list, making it easy to distinguish document states at a glance. To set a color, click the color swatch next to a status row on the Doc Statuses settings page.
4. Disabling Document Upload for Specific Statuses:
Enable Disable Upload on a status to prevent brokers or borrowers from uploading additional files while a document has that status — for example, to lock an approved document once it has been reviewed and accepted.
5. Managing Document Status Sort Order:
This determines the sequence in which statuses appear within the dropdown and in the Docs tab’s required documents list.
Understanding Sort Order Mechanism:
By default, all document containers with the status 'Pending Submission' have a sort order of #1, and they'll be at the top until a document gets uploaded. Once an upload occurs, the status automatically changes to 'Pending Review', which has a default sort order of #2. This makes 'Pending Review' documents move below 'Pending Submission' doc containers. This sorting mechanism helps organize your doc list, keeping items yet to be collected at the top and the already collected ones at the bottom.
Tip: Customizing Sort Order If You Do Not Want The Docs To Change Sort Position:
If you prefer that document containers don't change their place in the order, simply change the Sort Order of all statuses to 1 (the same as 'Pending Submission'). This way, documents won't move when a file is uploaded, or a when status changes. Otherwise, as you change a document's status, its position in the order will change accordingly.
We hope this guide helps you utilize the custom Document Status feature with the Required Docs effectively, making your document management smoother. For any further questions, don't hesitate to reach out to our support at helpdesk@lendingwise.com
Understanding the Doc Statuses Columns
Each row in the Doc Statuses table contains the following configurable columns:
- Default: Sets the status a new required document starts with (e.g., Pending Submission).
- Default After Upload: Sets the status a document automatically changes to after a file is uploaded (e.g., Pending Review).
- Disable Upload: When enabled, prevents borrowers and brokers from uploading files while a document has this status.
- Inactive: Hides the status from the selection list. Documents already assigned this status will retain it.
- Sort Order: Determines the display sequence. Statuses sharing the same sort order number are listed alphabetically.
⚠️ Caution: Do not click the red reset button (circular arrow icon) on a status row unless directed by support. This button is unlabeled and its action cannot be easily undone.