![owl-Logo-1.png]](https://help.lendingwise.com/hs-fs/hubfs/owl-Logo-1.png?width=43&height=46&name=owl-Logo-1.png)
Every loan file has one Primary File Status at a time. Statuses show where each file is in its life cycle, control who can edit, drive the Pipeline tabs and Dashboard cards, and can trigger automations.
LendingWise starts you with statuses such as Lead, Application Started, Completed App, Pre-Approved, Processing, Underwriting, Clear to close, Closed, Draws, Servicing, Sold, Archived, covering a loan from lead to closing and beyond. You can edit, add or remove them. Keep them to the main stages you want to see at a glance: the more you add, the harder it is to see your pipeline in one view. Use sub-statuses to track extra stages.
Manage statuses
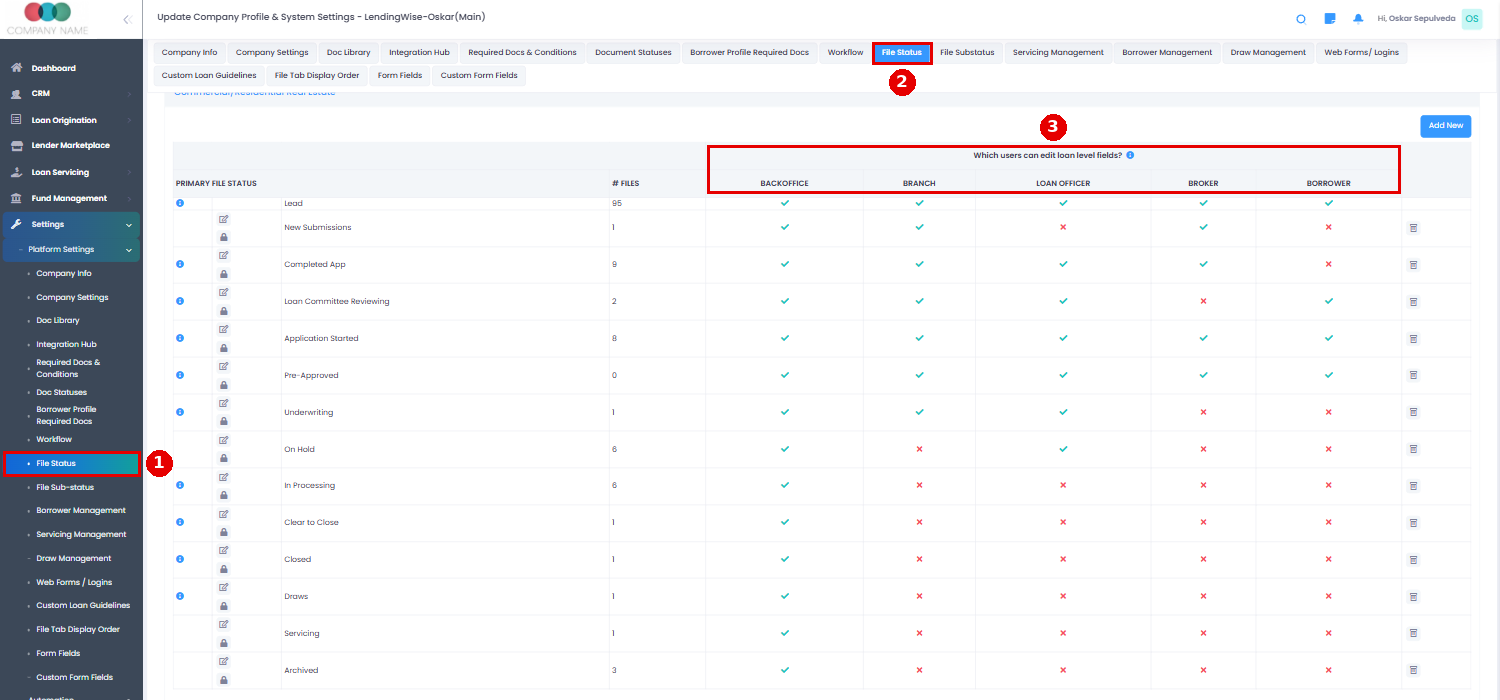
Go to Settings > Platform Settings > File Status. Pick a file type (or - All -) and click Search. Then:
- Drag statuses to change their order.
- Click Add New to create one, or the pencil to edit one.
- Click the lock next to a status to set Loan Status Hard Stop Rules (see below).
Status settings let you:
- Make files read-only by user type. For example, once a file is in underwriting, you may not want the borrower, broker or branch to change the loan data.
- Show the status, with its number of files and total loan amount, on users' Dashboards (Company Settings "Show file status in dashboard" must also be on).
- Show or hide the status in the borrower's portal (only matters if borrowers log in).
- Add a description. Users see it when they hover the status in the Pipeline, so everyone knows what the status means.
Who can edit at each status
The grid ("Which users can edit loan level fields?") has a column for each user type: BACKOFFICE, BRANCH, LOAN OFFICER, BROKER and BORROWER. A green check means that user type can edit their files in that status; a red X means they can't. Users can't move a file into a status they don't have permission for.
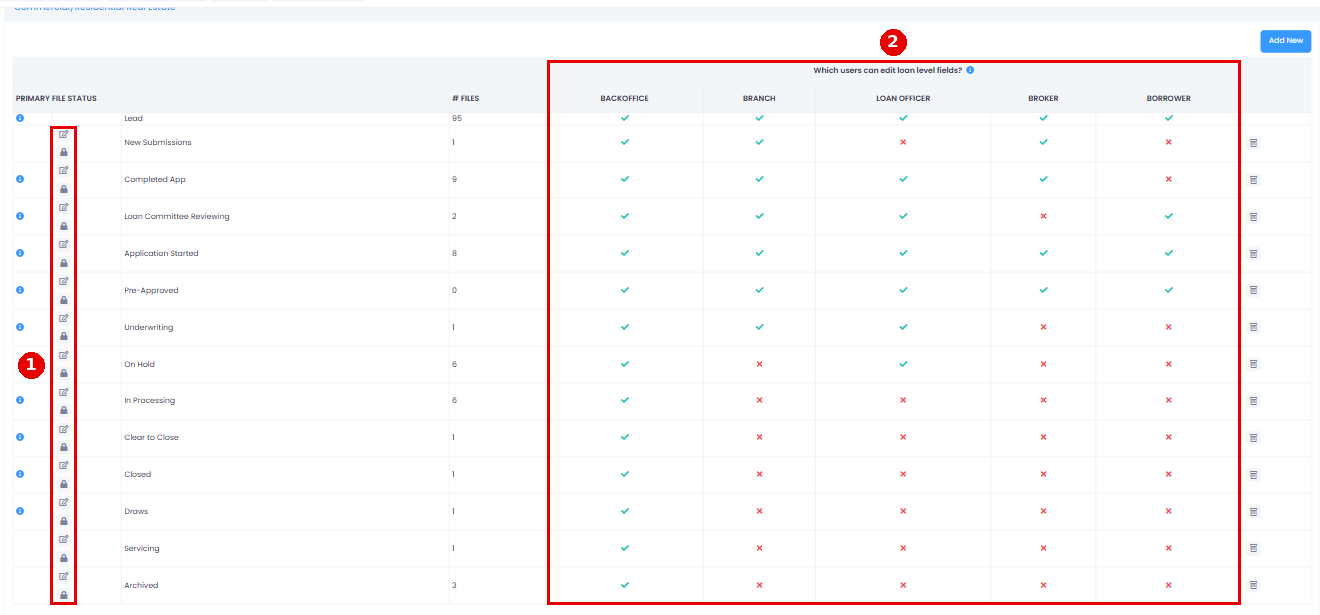
The examples below are from a sample account, so yours will differ:
- Brokers can edit when the status is Sold.
- Borrowers can only edit in Lead, Application Started and Completed App.
- Back office users can edit in every status except "Completed App".
Hard Stop Rules: require things before a status
The lock icon next to a status sets requirements (fields, document statuses or workflow steps) that must be met before a file can move into that status. An orange badge shows how many conditions are set. The locks only show while "Enable Loan Status Hard Stop Rules" is on in Settings > Platform Settings > Company Settings.
Click the lock to open the Hard-Stop Rule window for that status. It has:
- Enforce this rule (under Rule Active): tick it so the rule blocks status changes.
- Applies To Roles: the roles the rule blocks. The choices are Manager, Branch, Broker and Loan Officer. Roles you don't tick skip the check.
- Also applies to these statuses: tick other statuses to guard them with the same conditions. You edit the conditions once and they apply to every ticked status. Untick a status to remove its rule.
- Conditions: click Add Condition for each requirement. Every condition must be met (they're combined with AND).
Click Save Rule when you're done. Disable Rule turns the rule off.
Important: back office users who aren't Managers are never blocked. Applies To Roles has no Processor or other back office role, so a Processor (or any back office role other than Manager) can move a file into a guarded status even when requirements are missing. A back office user with "Enable Manager Permissions?" turned on in their profile counts as a Manager, so a rule that applies to Manager blocks them too.
When a rule blocks a status change, the status isn't changed and a message says so. Click the Status / Sub-Status icon in the loan file header to see what's missing. Users with "Allow override of Loan Status Hard Stop rules?" turned on (in their back office user profile, under Editing and Visibility Permissions) can click Override the missing requirements.
Choose which statuses show on the Dashboard
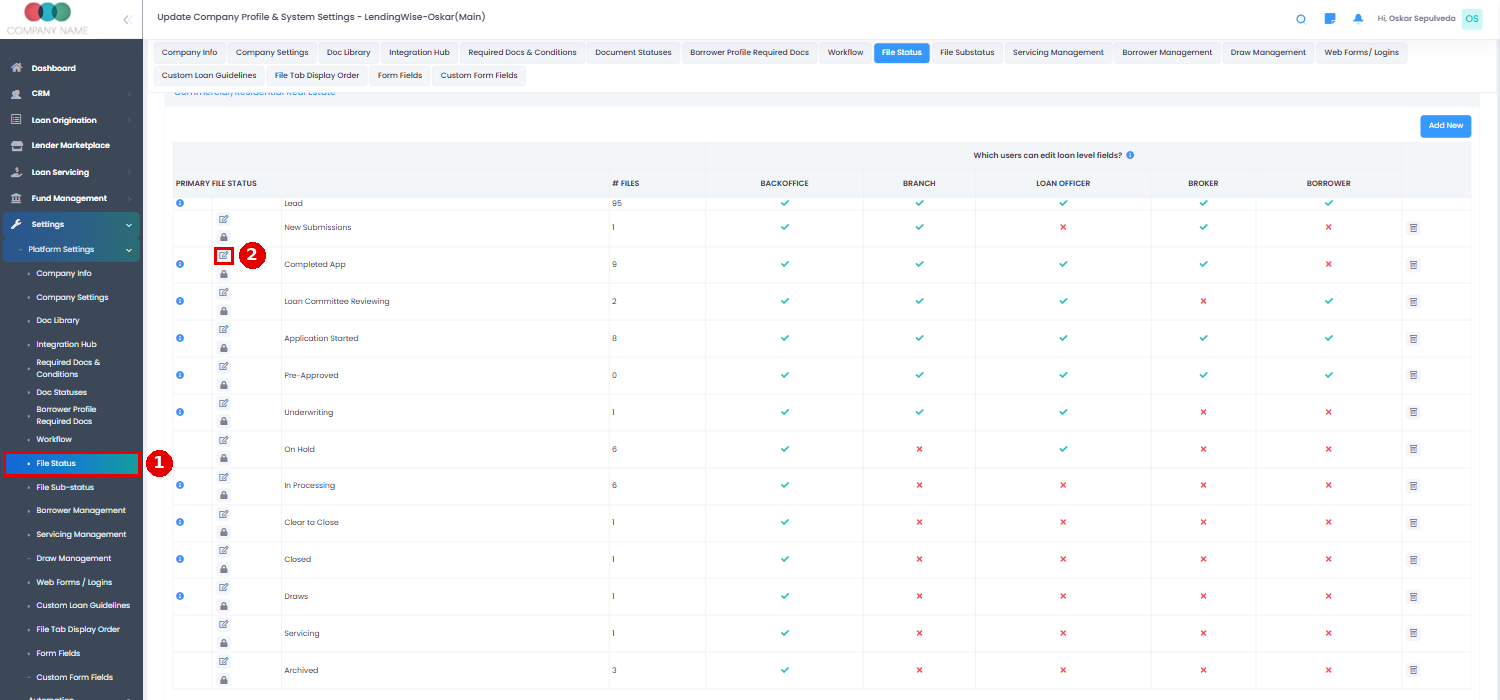
- Go to Settings > Platform Settings > File Status.
- Click the pencil next to the status.
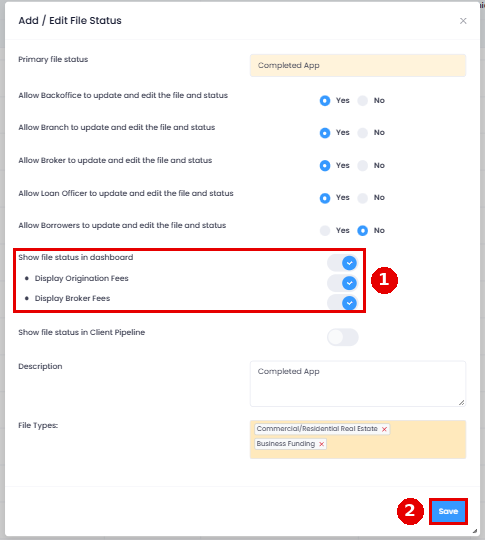
- In the Add / Edit File Status window, turn on "Show file status in dashboard" (you can also pick Display Origination Files or Display Broker Files), then click Save.
Note: loan officers and brokers only see files assigned to them on their Dashboard.
Tips
- Before deleting a status, move its files. Files in a deleted status sit in your Pipeline with no status. Mass Update (far right of Loan Origination > Pipeline - Main) can move many files at once, but it skips Hard Stop Rules and runs status automations with no pop-up.
- Automate by status. Status changes can send emails, create tasks or send webhooks through automation rules, even when a file has been in a status for a set number of days.