![owl-Logo-1.png]](https://help.lendingwise.com/hs-fs/hubfs/owl-Logo-1.png?width=43&height=46&name=owl-Logo-1.png)
Fund Management tracks your investors' money from start to finish: who put money in, which loans it went into, what interest it earned, and what you paid back out. It runs on top of Servicing 3.0, so the interest your borrowers pay flows to your investors on its own. You don't type income in by hand.
This article walks you through setting up a fund and running it day to day. For your investors' logins, see Fund Management: investor portal. For a public page to raise money, see Fund Management: offerings.
Before you start
- Your plan. Fund Management comes in two plans. The free plan runs one fund from start to finish. The full plan adds unlimited funds, the investor portal, offerings and the document library. To add the full plan, contact your LendingWise account manager.
- Servicing 3.0. A loan has to be onboarded in Servicing 3.0 before you can put fund money into it. See Servicing 3.0: set up and onboard a loan.
- Who can use it. Access is set on each person's profile: CRM > Back Office Users > Back Office User List, open the user, then under Special Reports or Features use Allowed to View Fund Management? (see fund screens) and Allowed to Edit Fund Management? (record money and change settings). New users start with both switches on. Investor data is sensitive, so turn them off for anyone who doesn't work on your funds (our recommendation).
Where things live
Everything is under Fund Management in the menu on the left.
| Menu item | What you do there |
|---|---|
| Funds | Setup: Fund Module Settings, your funds, Yield Tiers, Fee Configuration and investors. |
| Command Center | Day-to-day work. The page heading reads "Fund Dashboard". |
| Investors | One investor across all their funds, or one fund with all its investors. |
| Ledger | Every entry the fund has booked, with filters and a CSV export. |
| Documents | Share documents with investors (full plan). |
| Offerings | Your public fund page (full plan). |
| User Guide | The in-app guide, with the full detail behind every screen. |
On the Command Center:
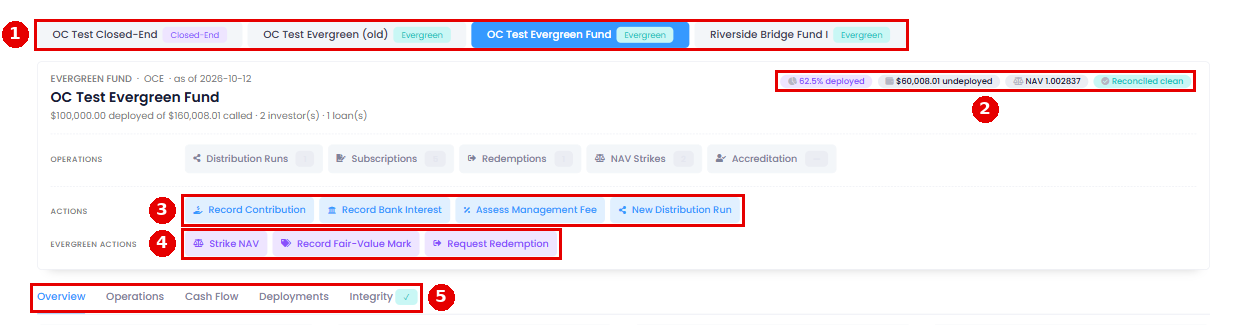
- Pick a fund from the row of fund names at the top. The status pills on the right show how much is deployed, undeployed cash, the latest NAV and whether everything reconciles.
- The Actions row starts the everyday work: Record Contribution, Record Bank Interest, Assess Management Fee and New Distribution Run.
- The row under it changes with the fund type. Evergreen funds get Strike NAV, Record Fair-Value Mark and Request Redemption. Closed-end funds get Record Commitment and Issue Capital Call.
- The tabs below are Overview, Operations (lists of contributions, runs, redemptions, NAV strikes and more), Cash Flow, Deployments and Integrity.
Ledger and Documents each have their own Fund picker. Check it before you read or add anything.
Step 1: Create the fund
- Go to Fund Management > Funds and click + New Fund.
- Pick the Type of Fund: Evergreen (open-end) or Closed-End (vintage). The rest of the form appears once you choose. Hover each option to see what it allows.
- Fill in the fields with a red asterisk. Every fund needs a Fund Name and an Inception Date. An evergreen fund also needs a NAV Strike Cadence, and a closed-end fund needs its Fund Term (months).
- Set Status to Open. New funds start on Draft, and only Open funds accept money. Status only moves forward (Draft, Open, Closed, Winding Down, Closed Out).
- Pick a Yield Structure (see below) and set how the fund handles borrower rate changes, default interest and capitalized arrears. Each field has a tooltip that explains it.
- Click Save Fund. A green message says "Fund saved."
Choose the type carefully. You can't change it once money has moved through the fund. If you pick the wrong one, wind that fund down and create a new one.
| Evergreen | Closed-End | |
|---|---|---|
| Life | Open-ended. Investors come and go. | A fixed term, then it winds down. |
| Ownership | Units, priced at NAV per unit | Dollars in each investor's capital account |
| Money comes in by | Contributions that buy units at the current price | Commitments, then capital calls |
| When a loan pays off | Principal goes back into fund cash for the next loan | Principal can go back to investors |
| Investors exit by | Redemption requests | Return-of-capital distributions as the fund winds down |
Yield Structure decides what the fund earns on each loan:
- Pro-rata: the fund earns the loan's full note rate on its share.
- Fixed Coupon: the fund earns the Coupon Rate %/yr you set, and anything the borrower pays above it stays with you as the manager.
- Preferred then Split: investors get a preferred return first, then the rest is split between investors and you, using the tiers you set under Yield Tiers on the Funds page.
- Tranched: rates per tier, also set under Yield Tiers.
Step 2: Set up fees
On the Funds page, under Fee Configuration, click + Configure Fees. Pick the Fund, the Mgmt Fee Basis (Committed Capital, Called Capital, NAV or Deployed Principal) and the Mgmt Fee % / yr, then click Save Fee Config. A fund needs a rate here before you can charge a management fee.
Step 3: Add your investors
- On the Funds page, under Investors, click + New Investor.
- Pick the Investor Type (Individual, Joint, Legal Entity, Institutional, IRA Custodian or Trust) and fill in the Legal Name. Entities and trusts also get formation fields.
- Add the email (needed for portal access), the accreditation status and how they get paid under Distribution Method (ACH, Wire, Check, Reinvest (DRIP) or Hold). Tax IDs and bank numbers are stored as the last 4 digits only.
- Click Save Investor.
- For an entity, use Contacts on the investor's row to add the people you deal with (for example an Authorized Signer).
An investor's Status starts on Prospect. An investor set to Inactive can't receive new money. You never type an investor's ownership percentage. It's worked out from the money they've actually put in.
Step 4: Record contributions
- Go to Fund Management > Command Center and pick the fund.
- Click Record Contribution, pick the investor, and enter the Amount, the Date Received and a Reference (the wire or check number).
- Click Record Contribution. On an evergreen fund, the investor gets units at the current price.
- The same investor and reference can only be recorded once, so two wires from one investor on the same day need different references.
- Use the date the money actually reached the fund, and record it only once it has arrived (our recommendation).
Fixing a contribution. Nothing on the fund ledger is ever edited or deleted. On the Command Center's Operations tab, each row in Contributions has these buttons:
- Correct shows while nothing has been worked out from the contribution yet. Enter the right amount, date or reference and a Reason, click Reverse & Re-post, and confirm. The old row is marked Reversed, and the new one gets a Corrected badge that shows your reason when you hover over it.
- Adjust replaces Correct once something has been worked out from the contribution, for example a NAV strike or a distribution. It explains why and lets you record a new contribution for the difference.
- Note adds an explanation without changing any number.
Your investors see a corrected contribution as one entry at the right amount.
Step 5: Strike NAV (evergreen funds)
A NAV strike sets the price of one unit. New money buys in, and redemptions pay out, at the latest price. Strikes run on their own each night on your fund's cadence. To run one now, click Strike NAV. It takes you to NAV Strikes on the Operations tab, where you pick the date and click Strike NAV Now. The first strike sets each unit at $1.000000.
The date box accepts future dates, and redemptions price at the latest strike, even one dated ahead. Always strike on today's date or earlier (our recommendation). Fund Management dates follow US Eastern time, not your company's time zone, so late in the evening on the West Coast, "today" can already be tomorrow.
If the fund values loans at fair value, record each loan's value with Record Fair-Value Mark. Marks change NAV but don't touch the ledger.
Step 6: Put fund money into loans
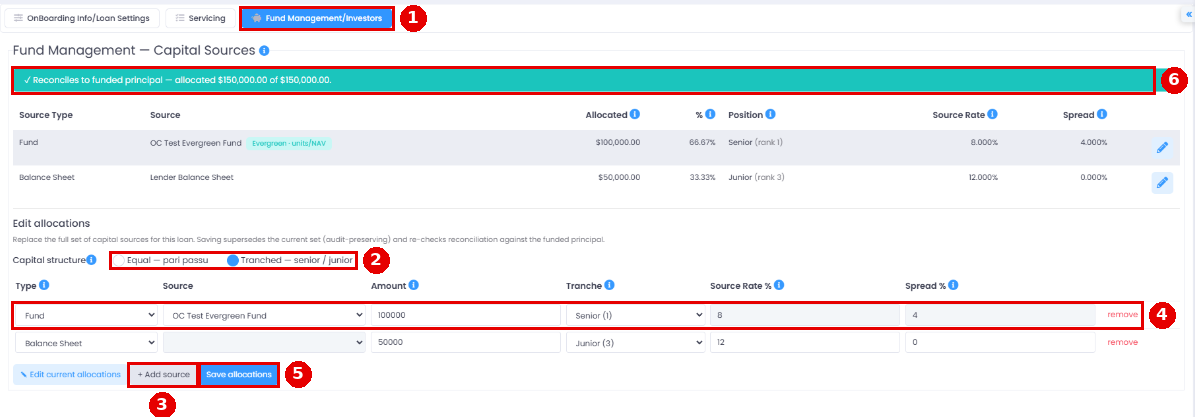
- Open the loan file. In the menu on the left, under POST-CLOSE, click Servicing 3.0, then the Fund Management/Investors button.
- Under Edit allocations, choose Equal (pari passu: everyone shares equally) or Tranched (senior / junior).
- Click + Add source for each capital source. Pick the Type (Fund, Direct Investor, Balance Sheet or External Line), the source and the Amount. For tranched loans, pick Senior, Mezzanine or Junior.
- Check the fund named on each row before you save. A new row starts on the first fund in your list (our recommendation: always check it).
- Click Save allocations. The badge turns green when the allocations add up to the loan's funded amount, to the cent. Red shows the difference.
A fund's rate is filled in from its Yield Structure, so you don't type it. For a balance sheet, direct investor or credit line, you enter the rate and spread yourself. A rehab holdback counts toward the loan but stays in fund cash until each draw goes out. To change an allocation later, use the pencil or Edit current allocations. The old one is reversed for you.
The fund's deployment is dated the loan's funding date, even if that's before the fund's inception date. For clean records, put a loan into a fund once the fund has the cash (our recommendation).
Funded loans with no capital source are listed under Awaiting capital attribution on the Integrity tab, and in Loan Servicing > Servicing Reports 3.0 > Awaiting Capital Allocation.
How income reaches the fund
You don't record loan interest. Each day, Servicing 3.0 works out the interest the borrower owes, and the fund books its share as accrued income (earned, not collected yet). When the borrower pays, it becomes realized income (cash in the fund). Only realized income can be paid out to investors.
If the fund's own bank account earns interest, record it with Record Bank Interest (amount, date and statement reference). It counts as realized income right away.
Step 7: Charge management fees
- On the Command Center, click Assess Management Fee.
- Enter the Period Start and Period End, then click Assess Fee. The fee is the basis × the yearly rate × the days in the period (counting both ends) ÷ 365, and it posts on the end date. The message shows the amount, the basis and the days.
Charge back-to-back periods that don't overlap, for example the 1st to the last day of each month, and only for periods that have ended (our recommendation). Overlapping periods are charged again.
Step 8: Pay out income (distribution runs)
- On the Command Center, click New Distribution Run. Pick the Type (Income, or Return of Capital for closed-end funds), the Period Start and Period End, then click Create Draft. The system works out what can be paid and each investor's share. You never type amounts.
- On the Operations tab, under Distribution Runs, click Show to see exactly how the run was worked out. Use Void to throw away a draft you don't want.
- When it looks right, click Post and confirm. Posting books it to the ledger and updates every investor's balance.
- A run pays out income that was collected in the period and hasn't been paid out before.
- Evergreen funds split by units held. Closed-end funds split by dollars contributed.
- Investors set to Reinvest (DRIP) get new units instead of cash.
- Closed-end funds with Preferred then Split pay each investor's preferred return first, then split the rest between investors and you as the manager.
- Management fees aren't taken out of a run. The run pays the full income, and the fees come out of fund cash.
- Reverse undoes a posted run by adding offsetting entries. A run that reinvested income for anyone can't be reversed, so check Show carefully before you post one (our recommendation).
Investors leaving an evergreen fund (redemptions)
- Click Request Redemption, pick the investor, and enter the Units and the Request Date.
- The request waits out the fund's notice period and any lock-up, then prices at the next NAV strike.
- If requests go over the fund's gate (the most that can leave in one window), the request is filled in part (Partial) and the rest waits for the next strike. Track it under Redemption Queue on the Operations tab, where you can also Cancel a request that hasn't priced yet. Once a request is partly filled, it can't be cancelled, and the rest waits for the next strike. The Redemptions count at the top of the Command Center doesn't include part-filled requests, so check the queue itself (our recommendation). The investor's portal doesn't show the held-back units either, so tell them yourself.
Once a request prices, it's marked paid on the fund's books straight away. LendingWise doesn't move the money, so pay the investor from your bank at that point (our recommendation). Enter a request only once you've agreed it with the investor.
Commitments and capital calls (closed-end funds)
- Click Record Commitment for each investor's signed commitment.
- Click Issue Capital Call to call a percentage of every commitment by a due date. The call is your schedule. It doesn't book any money.
- As each investor's money arrives, record it with Record Contribution.
As loans pay off, you can return principal to investors with a Return of Capital distribution run.
When a loan loses money (write-downs)
On the loan file's Fund Management/Investors tab, under Write-downs / impairments, enter the loss amount, the date and a reference, then click Distribute loss by rank. Among fund sources, the most junior takes the loss first, then mezzanine, then senior. A Record recovery row then appears. Its Restore by rank button pays back the senior fund first.
- Only fund sources take part. On a loan shared with your balance sheet, a direct investor or a credit line, the whole loss goes to the fund sources, and you can't record more than the funds' share.
- The loss posts the moment you click, with no confirmation step. Double-check the amount first (our recommendation).
Check your numbers
The Integrity tab checks, for the fund you've picked, that loan allocations, deployments, repayments and income all match Servicing 3.0. The same checks run every night. Anything that doesn't match is flagged there.
Some totals on the Command Center refresh overnight, so a change you just made may take until the next day to show in every tile.
Suggested setup order
Our recommendation, based on testing:
- Check Fund Management access on every back office user. New users start with it on.
- Create the fund and set it to Open. Pick the type carefully, because it's permanent.
- Set up Fee Configuration.
- Add your investors.
- Record contributions as money arrives.
- Strike NAV (evergreen funds).
- Allocate your onboarded loans, checking the fund on every row.
- Charge management fees for periods that don't overlap.
- Create distribution runs, check them with Show, then Post.
- Give investors portal access (full plan).
- Publish an offering last (full plan).