![owl-Logo-1.png]](https://help.lendingwise.com/hs-fs/hubfs/owl-Logo-1.png?width=43&height=46&name=owl-Logo-1.png)
Servicing 3.0 tracks a funded loan's payments, interest, fees, charges and payoffs right inside the loan file. This article covers the one-time company setup and how to onboard a loan. For the day-to-day work, see Servicing 3.0: payments, charges, approvals and payoffs.
Before you start: Servicing 2.0 is being retired. Use Servicing 3.0 for every loan you service in LendingWise.
Step 1: Fill in your company servicing settings
Do this once, before you onboard your first loan. Your statements, payoff letters and borrower emails pull from these settings.
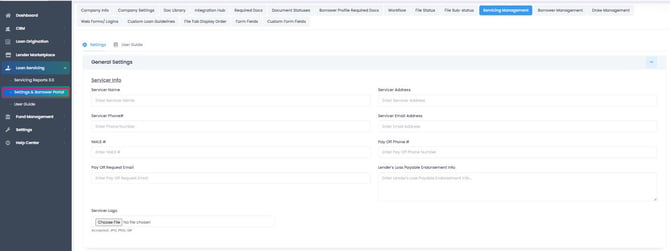
- In the sidebar, click Loan Servicing > Settings & Borrower Portal. (You can also get there from Settings > Platform Settings > Servicing Management.)
- Fill in each section:
- General Settings: Servicer Name, Servicer Address, Servicer Phone#, Servicer Email Address, NMLS #, Pay Off Phone #, Pay Off Request Email and your Servicer Logo. Statements print without your contact details if these are blank.
- Payoff Statement Info: your payment remittance address and your wire and check instructions.
- Mortgage Statement Info and Preferred Payment Day.
- ACH / NACHA Origination: your bank's details. You can't create ACH files until these are filled in.
- Email Notifications: payment reminders, late and default notices, maturity notices, payment receipts and more. Capture mode (no real emails) is on by default, so nothing goes to borrowers until you turn it off. Turn it off only when you're ready for borrowers to get real emails.
- Borrower Portal and Payoff Fee Templates.
- Click Save.
Step 2: Decide who can approve servicing requests
Waivers, cures, extensions and (by default) preferred payment day changes wait for approval before anything posts. To let someone approve them, open their profile in CRM > Back Office Users > Back Office User List and turn on Grant Servicing Approvals. Managers can always approve.
Step 3: Get the loan file ready
The Import button copies details from the loan file, so check these first:
- Loan Info tab: save the interest rate and the loan amount on the Loan Info tab itself. Import reads them from there. If the rate is blank there, Import fills in 0.
- HUD tab, line 901 (Interest Charged From / End): Import copies these as the stub interest dates.
- Entity borrowers: fill in the entity section. Import uses it to set the Borrower Type.
- Rehab loans: pick the Draw Management mode and enter the financed rehab amount before you onboard.
- Open the loan file. In the menu on the left, under POST-CLOSE, click Servicing 3.0.
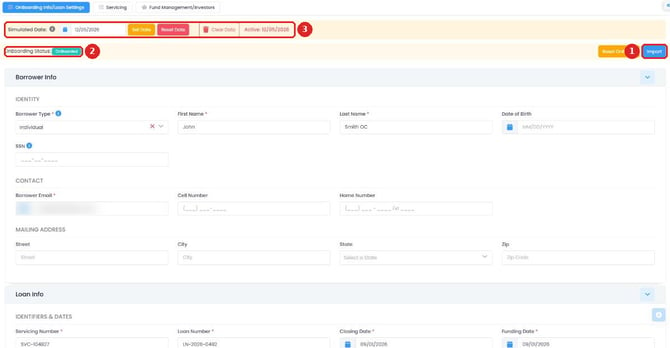
- On OnBoarding Info/Loan Settings, click Import, then YES.
- Check what Import filled in and complete the rest. Import doesn't fill everything. Expect to enter some or all of these yourself:
- Borrower Type, Servicing Number and Loan Number
- Closing Date, Funding Date, First Payment Date and Maturity Date
- Rate (check it isn't 0), payment frequency, payment day and accrual type
- Late fee, default interest, exit fee and prepayment penalty settings
- Decide the settings that can't be changed after onboarding: Capitalization of Arrears, Borrower Portal Payoff Quotes, Extension Options, Rate Type and, on rehab loans, Draws Mode. They lock when you onboard.
Tip (our recommendation): jot down the values before you save. In our testing, a save that failed cleared the form.
Step 5: Save and onboard- Click Save at the bottom of the page.
- Click OnBoard, then YES when asked "Are you sure you want to Submit the Details for Onboarding?"
- OnBoarding Status changes to OnBoarded. The loan funding (and any stub interest collected at closing) posts to the ledger right away.
- File status: onboarding doesn't change the loan's file status or its stage in the File Tracker. If your team uses them, update them by hand (for example, move the file to your Servicing status).
- Borrower bank details: on the Servicing tab, use Update Borrower to add ACH bank details.
About the Simulated Date bar
The Simulated Date bar (Set Date, Reset Date, Clear Data) is a testing tool. It moves a loan's clock forward so you can see what late fees and default would look like. Never use it on a real loan.
- A loan with a simulated date is skipped by the nightly run, so it stops updating on its own.
- Reset Date moves the clock back to today, but anything posted while the date was simulated stays on the ledger.
- Clear Data and Reset OnBoard can't be undone.
- If stub interest was collected at closing, the Unpaid balance and payoff amounts count it again. Check payoff amounts by hand on these loans until this is fixed.
- Import doesn't fill every field (see Step 4). Always review the form before you onboard.
If you need any additional help, please reach out to helpdesk@lendingwise.com.