Filtering, Searching, Creating Custom Reports, and Exporting Data in the Pipeline View
In this article, we'll walk you through the process of filtering, searching, creating custom reports, templates, and exporting data from LendingWise, enabling you to analyze and manage your loans and client data with ease. Export to your deal sizer.
(Video located at the bottom of the article)
Step 1: Filter and Search
- Navigate to the pipeline in the LendingWise platform.
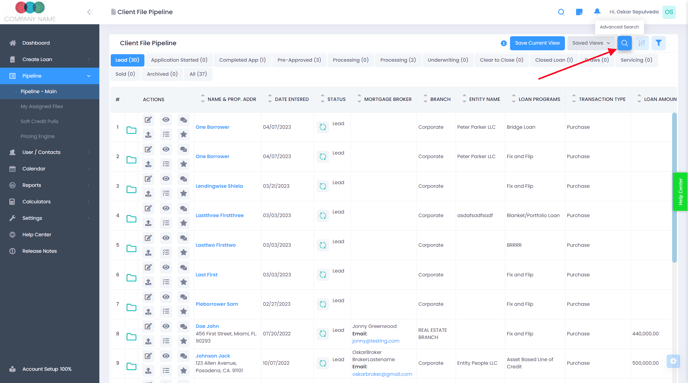
- Click on the Advanced Search button, represented by the magnifying glass icon located toward the top right-hand side of the screen.
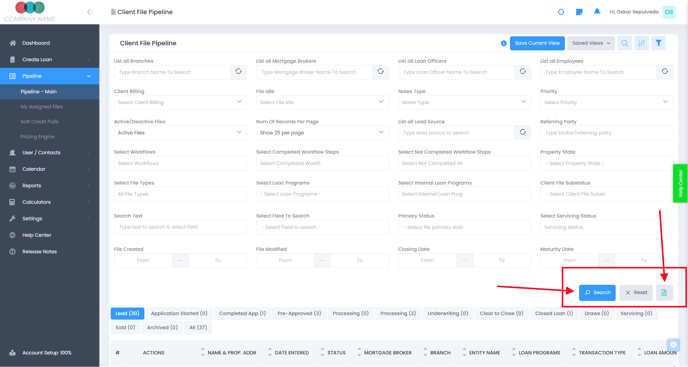
- Use the available filters to narrow down your search. Common filters include:
- Status of a file (e.g., closed loans or loans in servicing)
- Closing date (e.g., last quarter or last year)
- Maturity date of the loan
- Last modified or created date
- Loan program (multi-select option available)
- After selecting the desired filters, click on the blue "Search" button to display the filtered results below.


Step 2: Create a Custom Report for Exporting
- Once you have the search results, click on the green Export button with the Excel file icon to start creating a custom report.
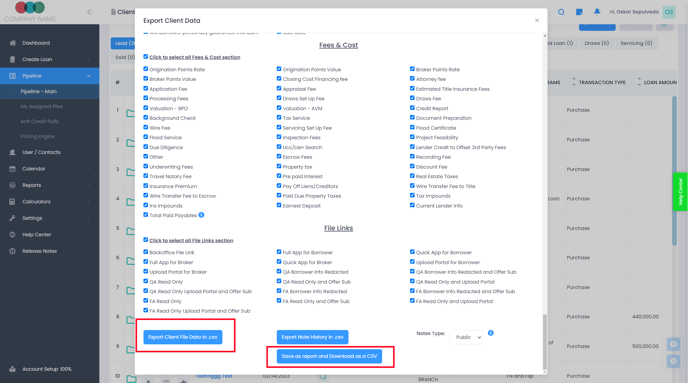
- In the “Export Client Data” window that opens, check the boxes next to the fields you want to include in your custom report export. You can add or remove fields as necessary. A “Click to select all fields” option is available toward the top of the window.
Step 3: Create a Custom Report Template for Future Use
- Ensure you have checked the boxes next to the fields you want to include in your custom report/data export template. You can add or remove fields as necessary.
- Scroll to the bottom of the “Export Client Data” window and click on the blue “Save as report and Download as a CSV” button.
- A field will appear prompting you to enter a report name. Type in the name you would like to use for your saved custom report template.
- Click on the blue “Save as report and Download as a CSV” button again to save the custom report template and export/download the file to your computer.
- To delete a previously saved custom report template, click the "Advanced Search" button, followed by the “Export Client Data" button with the green Excel file icon. In the "Export Client Data" window that appears, choose the saved custom report you wish to delete from the "Select Data Points from Saved Reports" drop-down menu. Click "Delete" and confirm your decision when prompted. A confirmation message will appear, indicating the successful deletion of the saved custom report.

Step 4: Export Data
- With your custom report configured, click on the blue "Export Client File Data in CSV” button located toward the bottom left-hand side of the “Export Client Data” window.
- After clicking the export button, a CSV file will be generated and downloaded to your computer, which can be opened with Excel or any other compatible spreadsheet tool.
Now you can filter, search, create custom reports, create custom report templates, and export data from the LendingWise platform. This will help you analyze your loans and client data efficiently and streamline your workflow. By filtering and sorting data, using pre-built or custom reports, and exporting the data in a convenient format, you can improve your loan management process.
Excel Export - How to modify the columns export
If you would like to know how to filter and re-arrange the columns and headings displayed in the Pipeline View, please see the following article: Pipeline Views