The process of creating an automation involves two parts: an Action (e.g., creating an email, task, or webhook) and a Rule (e.g., triggering the action through a change in Primary File Status, Sub Status, or a Workflow Step).
In this example, we will create a webhook automation that will send data out whenever a quick app is submitted.
Creating a Webhook Action:
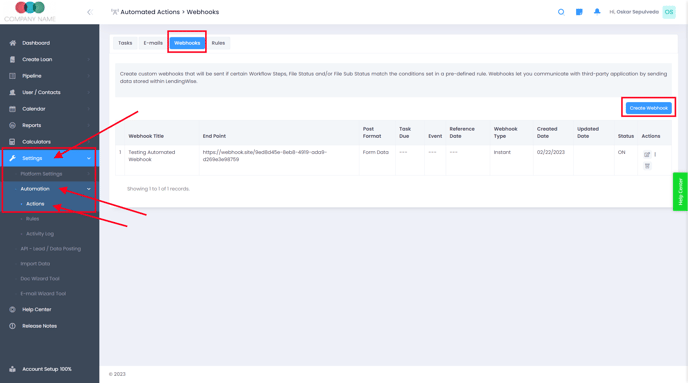
- Navigate to Settings > Automation > Actions, then click on the Webhooks button at the top of the page.
- Click on the blue Create Webhook button toward the right-hand side of the page.
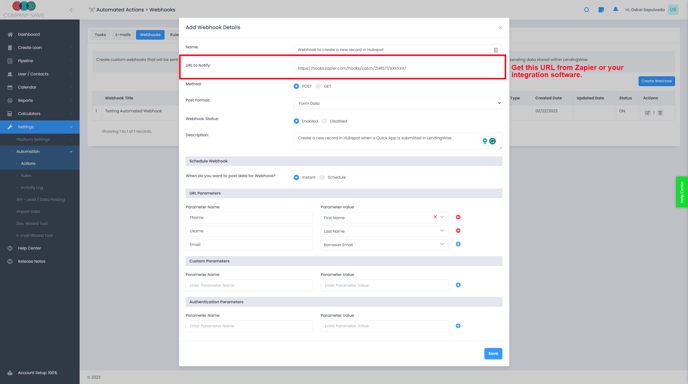
- Fill out the "Add Webhook Details" form:
- Name: Choose an identifiable name for the webhook.
- URL to Notify: Use the URL provided by the integration platform (Zapier in this example) where the data will POST to.
- Method: POST
- Post Format: Form Data
- Webhook Status: Enabled
- Description: Describe the automation.
- Schedule the Webhook: Choose 'Instant' to post data immediately when the automation is triggered.
- URL Parameters: Define the parameters to transfer (e.g., FirstName, LastName). As an example for the first name you can type FirstName or Fname or first_name and for the Parameter Value, you can use the drop-down menu to find and select the First Name field under the Borrower Info. Use the blue plus button to add additional parameters.
For a complete list of parameters that can be sent out from LendingWise, please see:
Creating an Automation Rule:
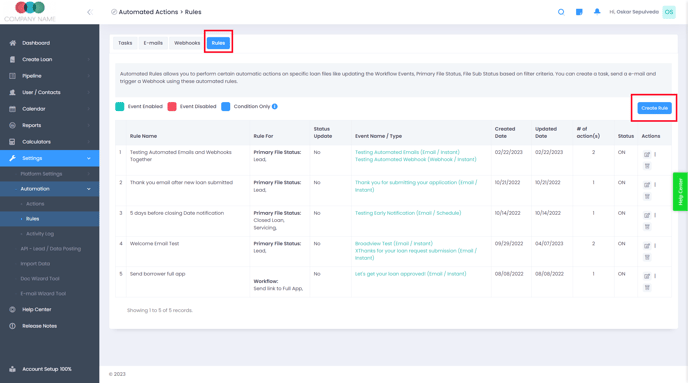
- Click on the Rules button at the top of the screen.
- Click on the blue Create Rule button on the right-hand side of the screen.
- Fill out the "Create New Automated Rule" form:
- Select File Type / Module: Select the relevant module (e.g., Commercial Residential Real Estate, Business Funding).
- Rule Name: Choose an identifiable name for this rule.
- Rule Description: Describe what the rule is and how it works.
- Allow rule to repeat? Choose on or off.
- Rule triggered when: Select the trigger for the automation (e.g., a change in Primary File Status).
- Set the trigger condition (e.g., when Primary File Status changes to 'Lead'). Leave the delay field blank to trigger the automation instantly, then click on the blue 'Done' button.
Connecting the Action to the Rule:
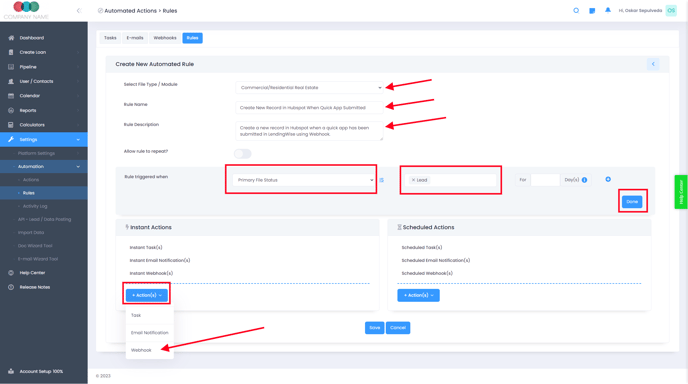
- Under 'Instant Actions', click on the blue '+Action(s)' button.
- Select the webhook you created from the dropdown menu.
- In the “Assign Instant Webhook” window, mark/tick the checkbox next to the webhook you want to attach to the rule, then click 'Save'.
- Click 'Save' at the bottom of the “Create New Automated Rule” window.

Upon successful completion, you should receive a green confirmation message.
Now that you have successfully sent the data to the integration software, which is the halfway point, now you only need to send the data from the integration software, in this example Zapier, over to your 3rd party system. Since every system is different, you would need to contact support for that 3rd party system and they will be happy to help you finish the integration of sending the data from Zapier into their system.
How To - Webhook Automation
By following these steps, you can effectively utilize webhook automation for outbound data transfer integration, improving efficiency and integration between LendingWise and other third-party platforms.
To learn how to set up inbound integration, please see the following article: API Integration for Inbound Data Transfer to Post New Leads into LendingWise